Tuesday, October 8, 2013

1180-1210 Crown Tournament Commission - Daniel's Test Fit

You'd think it was made for him or something ;-)

A little large!
Just right!


Buddy crusader ;-) 


SUPER excited to see how well this fit. I was really nervous that it was going to be too tight in the chest but it fit beautifully and there was enough length for a nice rolled hem. I really need to trust my measurements more!

-E

Monday, October 7, 2013

1180-1210 Crown Tournament Commission - Part 3 - Bliaut

The Bliaut

The next step in this project, as I was awaiting Daniel coming up for a test fit, was to start work on Ennelynne's bliaut. I have several inspirations for this piece, but am striving to make as historical of a reproduction as possible.

The bliaut will be out of black linen, with red beading and gold stencil embellishments. The neck lining and arm bands, as well as the lining of the sleeves will be made with red linen. I have so far sewn and pinned the maunches, and cut out the dress. 

The body of the gown, cut and pinned

I'll be hand sewing most of the edging on this dress, and am honestly toying with the idea of hand sewing the entire thing. I've doubled the edges all around in order to attach the binding for where the lacing will be, and I think it will just look better and be more accurate if the entire thing is hand stitched together. I have to do all the actual sewing on the edges, they are just pinned and pressed at the moment, but I think the extra time will be worth it for the finished product. Plus, rolling seams around curves is so much easier by hand.

Long side seam, pinned and pressed
Curved armpit seam, pinned and pressed

I also cut out and assembled the maunches (the draped sleeves) for this gown, and they are fully lined. They are pinned, pressed, and awaiting their hand finishing. All the evidence I've seen on this gown is that these portions were assembled separately, and then bound together above the elbow with the seam generally covered by some sort of decorative trim. This allows the main body of the over gown to lace from hip, along the body to this elbow seam providing a close customized fit.

Maunch, showing lining and pinning
Maunch, note the square shape


Entire gown, laid out flat to show proportions
The gown is laid out in it's entirely here, and you can see how long the maunches are in comparison to the rest of the garment and the body. I had a hard time guessing what length to make these, so it really is a guess. I found a few photographs of other bliauts that people had made and guestimated where I thought the sleeves would end based on where they hang when the wearers had their hands at their waist. Hopefully it all comes together and looks nice when it's finished. 

I'm a little bit worried that the arm hole on the maunches is going to be too tight for Ennelynne's arms, as I believe hers are slightly bigger than mine and I know that she likes more movement in her garments. With the lining and over the under tunic the sleeves fit on me, but they are tight. Worst case scenario I can add a small amount of stretch when I bind the two together by sewing a small gore into the seam and covering it with the binding for the upper arm. 

I'm excited to get home and keep sewing on this project ;-) 

-E

1180-1210 Crown Tournament Commission - Part 2 - Embellishments

Stencil Drawings

We discussed the different forms of embellishment, and decided that gold and black stencil work would be the easiest option given the time constraints, and would look quite nice. I decided to try the Martha Stewart Metallic Paints, and they gave a nice result on the fabric swatches I tested. 


I purchased their Metallic true gold, and it's a really nice color. Very gold, not orange or green tinted and a really nice crisp color. It's a thick liquid paint and applies really nicely on the fabric. There were a few spots where it bled through, but this was just on a swatch to test it out and I was just holding the stencil down with my hand, not actually stabilized on the fabric or taped. It came out nicely with a clean coverage, and minimal bleed through. 

Stencil for trim
One coat, even coverage of stencil paint


Below is one of the detail photographs from a reproduction in an extant piece. We discussed the option of doing something like this along the bottom of the under garments on Daniel's tunic, in black. He's designing a stencil that will have alternating his and Ennelynne's devices in the center circle, and linear work in a similar pattern aroud the outsides. The idea is to have the stencils not be continuous so that space can be placed in between them to make them fit on the given space of fabric. 

Extant reproduction detail of trim
 The below photograph is the inspiration for Daniel's outfit. His under tunic is gold and has the split neckline with the keyhole cut, as shown below. I'll be doing some sort of decorative stitching around his neckline and sleeves, and adding gold and black stencil painting to both pieces. 


Reproduction piece that was inspirational

I opted for drawing another stencil in order to design exactly what I wanted. I thought this would nicely compliment the other baroque style stencil we purchased, and they will probably be used in an alternating fashion. 


I let the paint dry on the fabric for 48 hours then decided to see how sturdy the paint actually was. Both samples below were painted, left to dry, and then vigorously hand washed with dish soap in my kitchen sink. The black didn't move at all, and retained it's shiny quality. It had penetrated the fabric a little more than the black, but even in areas where it wasn't very thickly painted in stayed with no budging or fading. 

The gold paint, however, lost a lot of it's luster and began to flake off with any sort of scrubbing. It didn't have any issues getting wet or being dried, but definitely wouldn't hold up to a laundry machine. I tried a second swatch and let it dry, and then heat set it with an iron before washing it in the sink but there was still a fair amount of paint that chipped off.


I've ordered a second type of fabric paint from Dharma Trading that is made by Jacquard and is specifically designed for use on fabric. We'll see if that holds up any better before I get to painting the gold on the black. 

Paint and Beading

There's also a plan to do a lot of beading on both the bliaut and Daniel's over tunic, in a similar fashion to the extant inspirational piece. I purchased a few containers of red glass beads, and they look really nice on top of the fabric. I haven't decided on a pattern for the beads yet, but will be laying that out sometime this week.  


More photos to come later ;-)

-E


1180-1210 Crown Tournament Commission - Part 1 - Undergarments

Her Undergarments

The undergarments for this project were patterned from Norse style tunics, as from what I've seen early period block construction was pretty similar across the board. I've got some experience and a working set of Norse tunics, so that's where I started from. 

I completed Ennelynne's under garment the second night, and did all the visible stitching by hand. I had originally machine sewed along the neck line and the sleeve edges, but after taking a second look I picked it out and stitched by hand with a running stitch and DMC Silk heavy thread. 

Neck, from outside
Neck, inside whip stitch
 Interior and exterior views of the neckline with the machine stitching removed. The inside edge is whip stitched down flat, and the outside has the running stitch which is purely decorative.

I think this gives the overall project a much more finished look. Decorative topstitching and a hand-whipped edging were also done on the cuffs, and on a good 5 yards of bottom hem!

Cuff, inside view
Cuff, outside view

Bottom hem, all completely hand stitched.
The only machine stitching on this garment is the construction seams, and none of the visible stitching is done by a machine.

As Ennelynne and I are almost the same size, it makes it easy for me to test fit and to hem for length. Below is a "completed" picture of me in the dress, showing off length, fit, and the pretty hand work!

This dress has a really nice drape and flow to it, I'd forgotten how nice it was to work in entirely natural fabrics. I'm a little bit worried that it will be tight across the bust, as Ennelynne is bigger than me in that department, but all the test fitting seemed okay and the neckline has been reinforced with two different sets of stitching.

Here you can see the hand work on collar and cuffs.

His Undergarments

I was able to get Daniel's tunic patterned, cut, and assembled and am awaiting a trip from him this afternoon for a test fitting before I do all the finishing work. I am a little bit nervous that his may be slightly restrictive across the chest, as the measurements are very close and I honestly don't remember how much ease I added into them when I took them (bad seamstress). 
Cutting out Daniel's tunic

Detail work of Daniel's collar with topstitching
Sewing sewing sewing!


Seamstress hard at work! Notice the chains and ropes tying me to my machine!
 This tunic came together really quickly, especially after having just assembled Ennelynne's the previous day. I still need more practice getting my gores lined up and taking the time to measure everything twice instead of just winging it, but I was lucky and everything came out even and matching. The seams on Daniel's were sewn with a slightly larger seam allowance, as I wasn't sure if I'd measured correctly and, like I mentioned earlier, I couldn't remember how many inches I'd worked into my measurements for ease. I would rather have it too big and be able to take it in than have it too small and be in trouble.

Speaking of too big, here's a couple of shots of me trying it on. Not quite the same for a test fit ;-)

Daniel has some long arms, and I'm a few inches shy of 6'6.
 One of the changes I made between his and hers is that I added one less gore on each side to his under tunic. I didn't think it would require the same amount of fullness as hers did, and didn't want it to be too much underneath his second shorter tunic.

His, construction completed
His and hers, note the difference in size!


His and hers on top of each other. It's not that she's tiny, it's that HE is a frost giant.

 All in all the under garments came together really quickly, and the hand stitching was an evenings work. I'm expecting Daniel today for a test fitting and if all goes well then I will finish the hand work on his tonight. I've taken a break from his project as I wanted to make sure the pattern I used was working before I cut the black linen for his top garments. There's also a lot of plans for embellishments that will be coming as time permits. But that, my friends, is another post ;-)

-E


Monday, September 30, 2013

1180-1210 Crown Tournament Commission

The Project

I was commissioned by two good friends of mine for a set of matching outfits for their debut fighting in our Crown Tournament this November. With reasonably short notice for this project in terms of ordering materials and accouterments, there's going to be a lot of work put into it over the next 4 weeks to get it ready. I'm T-Minus about 31 days to the event, and have my work cut out for me! 

The Inspiration

There's a few hundred year time difference between his and her persona, with Ennelynne being mid 14th Century German, and Daniel being late 12th Century Teutonic. Combining cotehardies and crusader robes would have been quite the challenge, so Ennelynne opted to go earlier period for this costume. We discussed the options and in order to get the aesthetic they both are wanting, Daniel is coming slightly forward in time and she's going earlier, and have settled on an early 13th century outfit. 

Hers

Ennelynne will be wearing a bliaut, undergown, and appropriate head-wear for the time period and a woman of her station. Linens were ordered and her undergown has been started already. The idea is to have a gold undergown, black over-gown (the actual bliaut) and all the decorative work done in red. The entire outfit is made from linen, and embellishments on her collars and cuffs will be done in a very pretty gold silk, generously donated by our current majesty, Jung-Mie. Her persona is Korean and she has tons of very beautiful silk :) 

The inspiration for her gown was a piece I found browsing the internet a long time ago, and had bookmarked. It is too early for my persona however I loved the idea of making one for when I didn't feel like putting on all my corsets and layers. The original blog, and creator are credited here: Racaire's Embroidery and Needlework. She's got some -very- beautiful work and the photographs shown below are her property and her creations.

I've loved this silk bliaut for a long time and am very excited at the potential of creating one. We are designing stencil work for trim on the sleeves and neckline, and a large period-inspired stencil print for the edging along the bottom of the tunic and dress. The collar will be embroidered and beaded, and there will probably be accent beading all over the front of both outfits, too.
Photo property of Racaire


His

The inspiration for his piece came directly from a museum replica. There are several examples of the outfits of the time, and photographs can be found here: Ranaan SCA Gallery. I believe these pieces are reproductions either from some sort of fine costuming or a museum example, however there is no associated documentation, so it is just the images. His outfit will be a double-layer tunic, with one falling to ankle length and the other to just below the knee. Again, the color scheme will be black and gold with red embellishments. Below is the primary inspiration piece for Daniel's outfit. 

The detail and bead work on this make it a big favorite of mine. I will probably try to incorporate the gold leafing pattern into the piece that I make, however I'm not sure yet whether that will be painted on or made from beads. A lot of it is going to depend on how much time we have and how easily these projects come together.

There's also the negotiation about whether or not to make a cloth girdle for this outfit. Daniel traditionally wears a leather belt, however the thick cloth in the same style as the woman's dress looks quite nice, and could be made to match with Ennelynne's. 

The keyhole neckline will be bound with trim, as will the sleeve caps on the short over-tunic. The embroidery along the bottom of both tunics will be recreated with fabric paint and a custom-made stencil. 

I have yet to determine what the appropriate headgear for Daniel would be, as I haven't seen any examples of this style of dress in full turnout. I would imagine some sort of hat would have been appropriate, but this may be skipped over due to personal preferences of the person doing the wearing of the outfit! 

Both the under and over gowns in this outfit will be made from linen, and as I'm largely unfamiliar with early period mens garb, I will be modelling the pattern off a previous commission for a Norman overgown/tunic commissioned by someone else. 

This is one of the few examples I've seen of the closer-fitting under sleeves, which I really like. It gives the outfit a more tailored and finished appearance and I think makes the entire thing look more put together.

The Under-gown

I patterned Ennelynne for her undergown based on a early period camp dress I have. I couldn't find any real pictures of what the undergown would have looked like, but I imagine from other patterns and garments of the time period it would have been a simple, gored, geometric pattern.

I unfortunately didn't get any photos of the sewing in progress, but it came together quickly and easily. I opted to use the same style slit neckline as the over-gown would have, however on second look realized it should have been a keyhole neckline on the under dress.  I have a linen smock that has the appropriate neckline that I wear underneath my Persian garb, and that gave a very correct look when worn with the under-dress. Here's a sneak peek of it before it's entirely finished. I'm very much looking forward to continuing to work on this project.


More to come later!!

-E

Wednesday, September 4, 2013

Persian Caftan

Persian!

This was my first Persian, taken from Master Rashid's pattern that can be found HERE. The pattern was easy to follow and quick to assemble. I made a cotton mock-up to check fit and adjust before I laid it out on my good fabric. It's made with a heavy duck fabric with print on the outside, and a black linen/cotton blend on the liner. I tried to make it so it would be reversible, and have worn it both ways since then. I don't have any photos of myself in the finished product with all the accouterments, as I frequently wear this at night or if it's cold. 

I don't recall having any issues assembling this piece, and it was one of the first things I made where I didn't have a monumental problem setting my gores :) 

Pattern
First Neatly Set Gores


Front View, Finished
Back View, Finished


I'll eventually be doing more research into Persian as I spend a lot of my time mounted, and this is very easy to ride in. For now, I just have the one piece and I wear it layered over more modern clothes that can "pass" as period :) 

-E

Cotehardies

This post is serving more as a "Here's what I made this year" than a tracking of a current project. It's been a long time since I've sat in front of a sewing machine, and regretfully there are several projects stacking up on my craft table. I'll be starting to document new works as time goes on, but here's a recap with some images of Cotehardie projects that I completed over the course of the last 8-9 months. These are in no particular order of completion.

Green Linen Blend, Back Lace Cote


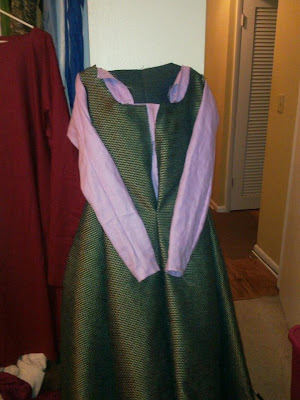
Here's a side on view checking the fit of the bust curve. I'd been encountering a lot of issues in getting a "football" shaped point in the middle of the bust and was sewing and re-sewing the curves trying to accommodate my bust.

I have the dress fit inside out here, and while I really like the line it forms under the bust, it's still not fitting quite right in the "middle in between the boobs" area.

I probably took this apart 4-5 times to try and get the central curve on the right angle before finally giving up and settling for what was close to straight.


Here is a shot of me checking placement of side gores. They're a little bit low in this gown, but I decided not to pick it back apart and resew them.

Ideally, they should fall right at the floating rib, but as I put so much extra fabric in my skirts I prefer them to sit a little bit lower so they don't bunch up underneath my belt.

Also, I need to clear off my counter of the strange collection of bathroom products prior to taking pictures of garb construction.


Below are four shots showing fit, from all angles. I really like the length of this gown, it forms a nice pooling at the feet when out of a belt. The puckering area at the bust that I was fighting with earlier is still visible, too. I think it may be too much of a curve in the curved-front.


Teal Linen Cote, Front Button

The second cotehardie I assembled was 100% linen, and is super comfortable. I still haven't actually finished this dress as I plan to have the buttons go entirely to the floor, and I need to finish tacking down the inside liner. 

I didn't have nearly as many problems with this one, so I've left most of the commentary out. Here are a series of photos showing different stages of construction.

Testing Fit of Gores, Front View
Testing Fit of Gores, Side View
This dress was a fun project, and is one of my more comfortable cotehardies. I was able to work out a few of the issues surrounding the bust curve, although I think adding buttons made it easier instead of having a seam. I love the 100% linen, it breathes great and stays cool even in the Florida sun. Definitely a HUGE move-up over synthetics or linen-blends. Below are a couple of photos of the finished product. 
Crown Tourney!
Tucked into a belt, with tippets


Pink Silk Cotehardie

The pink silk cotehardie was the cotehardie of death. I hated sewing it so much that I never actually wore it, and gifted it immediately to my sister the second she announced any sort of interest in the darn thing. I've since decided that sewing any sort of curved seam into dupioni silk is *way* more hassle than I ever plan to do again. Silk, in my world, is forever destined to straight seams and heavy pleating. 

That being said, the dress came together beautifully and despite all my fighting I am really pleased with how it fits. The photos of it don't do it any justice, it's a really beautiful salmon/coral color, and the trim is two shades of gold. 


This dress really was a beast. After I completed it I decided to add the trims onto the neckline and the bottom of the gown, and this, next time, should be planned out in advance!

Getting the gold banding to lay straight on a curved bottom gown was something I hadn't done before. I cut and edged the strips and they were flat stitched on top of the silk. I think next time it should be a strip of fabric attached onto the bottom of the gown, instead of an afterthought because I didn't like the edging.

Along the neck line, the gold is actually acting as sort of bias tape wrapper around the curve. Again, I think in the future this might be better done planned out in advance.

The finish product came out really nicely though, I'm happy with it and Ennelynne loves it :)


Ennelynne and Daniel Von Hessen, modeling their awesome garb!

Green Cote, Upholstery Fabric

The following photos are of a straight front green cotehardie, made out of a really heavy weight upholstery fabric. This was an early project, and before I updated and modified my pattern to one that was more historically accurate and draped to fit me. I have since purchased a new washer and dryer that apparently was much more effective than the old one, and despite my pre-washing and pre-drying.the.hell.out.of.it, it has shrunk and no longer fits. The straight front doesn't really work for my bust, which is why I changed over to a curved front pattern. It's great for Renn Faires or anything where I want to show off cleavage, but not historically aesthetic in terms of fit for me. 

Final Fitting
Before Sleeves, with under gown

Final Fitting. Nice support, but gratuitous cleavage!

And so concludes the update on my cotehardie progress. I've currently got a few more that the fabric is hanging out in the sewing room for, but I haven't done anything with it except cut and dry it. 

Onto the next catchup post :) 


-E